Build a simple API in Go with Fiber, Postgres, and GORM
According to the StackOverflow Developer Survey and the TIOBE index, Go (or Golang) has gained more traction in recent years, especially among backend developers and DevOps teams working on infrastructure automation. That’s reason enough to write a simple tutorial to introduce you to Go.
It’s worth learning it, so in this article, I wanna show you a brief guide on how to develop a scalable but simple CRUD API in Go using Fiber and GORM. For sake of simplicity, we won’t use Docker.
What is Fiber?
Fiber is an Express-inspired web framework built on top of Fasthttp, the fastest HTTP engine for Go. Designed to ease things up for fast development with zero memory allocation and performance in mind. So if you come from a NodeJS background, Fibe might be a good fit.
What are we going to build?
The project will be very classic. We are going to build a simple Book CRUD-based API. So we going to have different endpoints for create, read, update, and delete.
Prerequisites
You need to have a basic understanding of Go. I will choose Visual Studio Code as my code editor. You can use whatever you prefer. But keep in mind, that you’ll see the command code . once in this article. This is a VSCode (Visual Studio Code) specific command which opens the current directory in VSCode.
You also need to install these:
Any recent version of both is okay. However, my Go version is 1.18 and PostgreSQL is version 14.
Create Database
First, we need to create a Postgres database. I know, everybody handles that differently, some people use a GUI, but we going to use our terminal. Again, you need to have Postgres installed on your machine. If you have Postgres installed, the following four commands will run on Linux, Mac, and Windows machines.
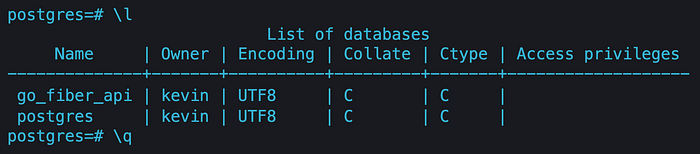
$ psql postgres
$ CREATE DATABASE go_fiber_api;
$ \l
$ \q
psql postgresopenpsqlCLI with userpostgresCREATE DATABASE go_fiber_api;creating the database we need\llist all databases\qCLI exit
My terminal would look like this after we executed all four commands successfully. As we can see, the database go_fiber_api was created.
Project Setup
First of all, we going to initiate our project and install the modules we need.
Watch out: Replace YOUR_USERNAME with your Github username.
$ mkdir go-fiber-api
$ cd go-fiber-api
$ code .
$ go mod init github.com/YOUR_USERNAME/go-fiber-api
Now let’s install Fiber, GORM, and Viper. We use Viper to manage our Environment Variables.
$ go get github.com/spf13/viper
$ go get github.com/gofiber/fiber/v2
$ go get gorm.io/gorm
$ go get gorm.io/driver/postgres
Let’s continue with the final project structure.
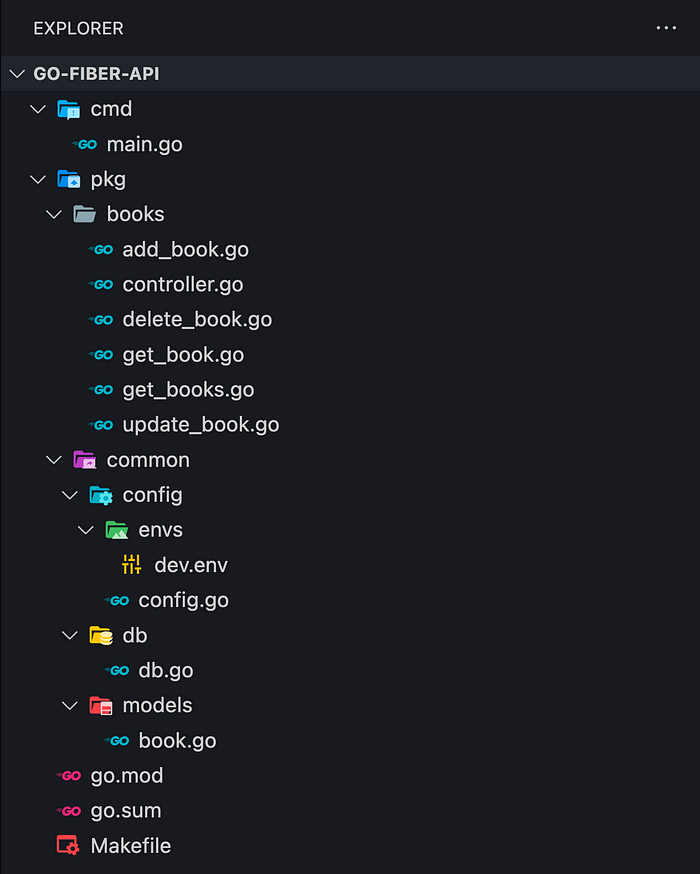
$ mkdir -p cmd pkg/books pkg/common/db pkg/common/config/envs pkg/common/modelsAdditionally, let’s add some files.
$ touch Makefile cmd/main.go pkg/books/add_book.go pkg/books/controller.go pkg/books/delete_book.go pkg/books/get_book.go pkg/books/get_books.go pkg/books/update_book.go pkg/common/db/db.go pkg/common/config/envs/.env pkg/common/models/book.go pkg/common/config/config.goSo, after creating our project, the file structure should look like this:
Now, it’s time to code.
Environment Variables
First, we need to add some environment variables where we store the application port we going to listen on and we URL to the database. Keep in mind, to replace DB_USER, DB_PASSWORD, DB_HOST, and DB_PORT with your database data.
Let’s add code to pkg/common/envs/.env
For instance, how it would look on my local machine:
Configuration
Let’s add code to pkg/common/config/config.go
Book Models
Here, we going to create the Book model/entity. gorm.Model will add properties such as ID, CreatedAt, UpdatedAt and DeletedAt for us.
In addition, we add 3 string properties. The json tag at the end gives GORM the information of each column's names in our Postgres database.
Let’s add code to pkg/common/models/book.go
Database Initialization
The book model is done. Now, we configure GORM and auto migrate the model we just created. This AutoMigrate function will create the books table for us as soon as we run this application.
Let’s add code to pkg/common/db/db.go
Main File
This is our bootstrap file. We going to do a lot here.
- Initializing Viper to handle our environment variables
- Initializing the database based on GORM
- Adding a simple “/” route
- Starting the application
We’re going to change this file later once again.
Let’s add code to cmd/main.go
Now, let’s test the current version of our project. Usually, the application will run in debug mode, so we will get some warnings, just ignore them.
$ go run cmd/mainOutput inside the console. The very last line is important.
Let’s visit http://localhost:3000

Great. We can see our application’s port. This means everything works as expected.
Book Handlers
Great, everything works. We’re going to replace this output, so don’t worry. Now, let’s add some handlers for our Book API.
Controller
The book handlers/routes will be based on so-called pointer receivers, for that, we define its struct. This struct will receive the database information later, so whenever we call a book handler/route, we will have access to GORM. We’re going to change this file once later again.
Let’s add code to pkg/books/controller.go
Add Book Handler
So this file is very interesting. After the imports, we define a struct for the request’s body. In line 16 you can see the pointer receiver we defined in the previous step. In line 31 you can see, that we using this pointer receiver whose variable name is simply h.
Everything else is pretty straightforward. We get the request’s body, declare a new book variable, merge the request’s body with this book variable, and create a new database entry. Then, we create a response with the book information.
Let’s add code to pkg/books/add_book.go
Get Books Handler
On this route, we going to return all books from our database. This works now pretty fast, but as soon as you have bigger data to handle, better go for a pagination approach.
Let’s add code to pkg/books/get_books.go
Get Book Handler
Here, we just respond with only 1 book based on the ID which we get from a parameter.
Let’s add code to pkg/books/get_book.go
Update Book Handler
If we add a book, we also should have the option to update created books. This route is similar to the AddBook route we have coded earlier.
Let’s add code to pkg/books/update_book.go
Delete Book Handler
This is our last route in this article. Here, we delete a book based on its ID, but only, if the desired entry exists inside the database. We only respond with an HTTP status code.
Let’s add code to pkg/books/delete_book.go
Controller (again)
The routes are done. Now we need to modify the controller file once again. This time, we create a function called RegisterRoutes, it’s pretty self-explaining what it does, right?
Do you remember the receiver pointer? Here we get the receiver pointer for our routes/handlers.
Let’s change the filepkg/books/controller.go from:
to:
Main File (again)
Also, we have to modify our main file once again. Before, we just initialized the database. But this time, we get its return and register our routes/handlers.
Let’s change the file cmd/main.go from:
to:
Makefile
This is optional. Here we can set some scripts to simplify commands. For instance, we define a server script to run the application. So instead of running the application by go run cmd/main we run it instead by make server. This example is not good, since the actual command is pretty short, but imagine you would have to deal with longer commands.
Let’s add code to Makefile inside the root directory.
Run Application
Everything is done! No coding anymore. Now, let’s run the application.
$ make serveror
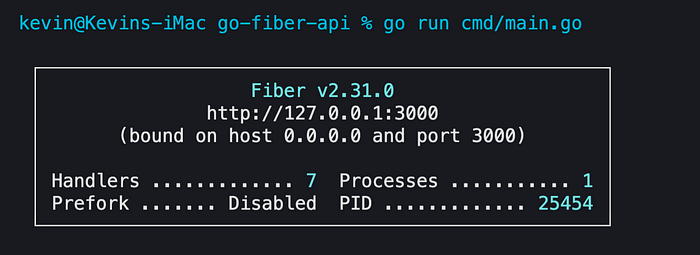
$ go run cmd/main.goThe output should look like this. Besides the warnings, we can see, that our routes got settled up and the application runs on port 3000.

Testing the Endpoints
Now, we can test the two routes we have just created. We can test it, by using software such as Postman, Insomnia, or we simply run CURL commands.
POST: Add a new Book
$ curl --request POST \
  --url http://localhost:3000/books \
  --header 'Content-Type: application/json' \
  --data '{
    "title": "Book A",
    "author": "Kevin Vogel",
    "description": "Some cool description"
  }'
GET: Get All Books
Don’t forget, you can run GET commands also in your browser.
$ curl --request GET --url http://localhost:3000/booksGET: Get Book by ID
$ curl --request GET --url http://localhost:3000/books/1PUT: Update Book by ID
$ curl --request PUT \
  --url http://localhost:3000/books/1 \
  --header 'Content-Type: application/json' \
  --data '{
 "title": "Updated Book Name",
 "author": "Kevin Vogel",
 "description": "Updated description"
}'
DELETE: Delete Book by ID
$ curl --request DELETE --url http://localhost:3000/books/1We are done! Great. Don’t forget, that I have uploaded this project on Github.
ไม่มีความคิดเห็น:
แสดงความคิดเห็น
หมายเหตุ: มีเพียงสมาชิกของบล็อกนี้เท่านั้นที่สามารถแสดงความคิดเห็น