CRUD OPERATIONS THROUGH A HTTP INTERFACE
In the previous article, we demonstrated establishing a successful connection to a local Postgres database using Go. In this article, we’ll continue working with the database and introduce HTML templates as an interface between HTTP requests made in a browser and CRUD (Create, Read, Update and delete) operations made against the database.
Prerequisites:
- An installation of Go. For installation instructions, see Installing Go.
- A tool to edit your code. Any text editor you have will work fine, I use Goland.
- A command terminal. Go works well using any terminal on Linux and Mac, and on PowerShell or cmd in Windows.
- A local installation of PostgreSQL
- Installation of the PSQL CLI
1. Reading from the database:
Let’s begin with what I believe is the simplest operation to achieve, reading from the database. We’ll run a SQL query manually using PSQL and then retrieve the information over a browser in an HTML template.
First, create a ‘users’ table with the rows: user_id , username, password, city and email. We’ll then seed some arbitrary data for testing. Open a PSQL shell and execute the following queries against the myapp db:
eomolo$ psql
psql (14.2)
Type "help" for help.eomolo=# \c myappYou are now connected to database "myapp" as user "eomolo".myapp=# CREATE TABLE users (
  user_id serial PRIMARY KEY,
  username VARCHAR ( 50 ) UNIQUE NOT NULL,
  password VARCHAR ( 50 ) NOT NULL,
  city VARCHAR ( 50 ) NOT NULL,
  email VARCHAR ( 255 ) UNIQUE NOT NULL);CREATE TABLEmyapp=# \dtList of relations
Schema | Name  | Type  | Owner
--------+-------+-------+--------
public | users | table | eomolo
(1 row)myapp=# INSERT INTO users(username,password, city,email) VALUES ('user1',123456, 'Lanham', 'user1@user.com');INSERT 0 1
myapp=#
Next, in your myapp project directory, create a directory ‘form’ where the html templates will exist. Inside it create an Index.tmpl file:
Construct and add the header and footer as well:
The form directory structure should currently be as follows:
ls myapp/form/
Footer.tmpl     Header.tmpl     Index.tmpl
In the main.go file, we’re going to import 2 additional packages:
- text/template — Package template implements data-driven templates for generating textual output.
- net/http — Package http provides HTTP client and server implementations.
We’ll need to create a struct defining a user model:
// define a user model
type User struct {
   Id    int
   Username  string
   City string
   Email string
   Password string
}
Refactor the main.go file as below adding an “Index” function that will Query the User table and return the content of it’s rows:
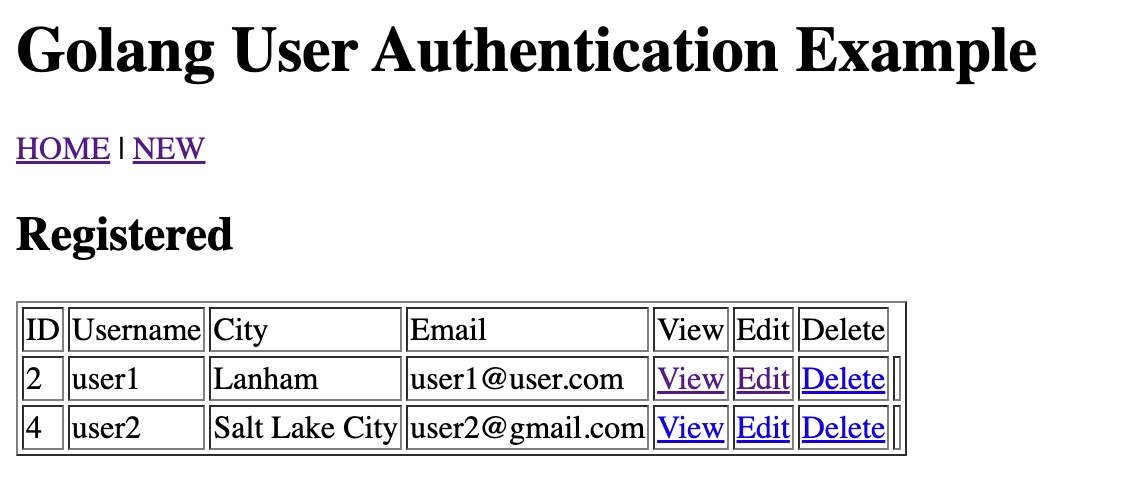
All users can now be listed by making a request to the address http://localhost:8080/.

2. Creating a user
Creating a user would require the capability to input information, then make a post request that can be passed to a function that will then insert the data into the database. Once it does so, it should then redirect to the index page that now displays the newly added information.
To achieve this, we’ll create a “New” and “Show” templates along with corresponding Insert and Show functions. The “New” template will include a form action to send the data to the “insert” path that will be used to pass input to the Insert function.
First, get the input required to create a new user using the New.tmpl form:
The form action will post the inserted data to a route “insert” which will create a new row in the database through it’s corresponding Insert function:
When the database statement is executed successfully, the browser will redirect to the index page now displaying the added user.

An individual user can be displayed using the View button in the table by constructing the following:
A show template that displays a single user:
And a show function that returns information from the database filtered by the Id value passed when the View button is clicked:
3. Updating a user
Now that we’ve achieved the capabilities of creating and showing users, we can now enable an edit function that updates an entry in the database then redirects to the index page showing the new data.
Let’s create an edit form that redirects to an “update” action.
Then, an edit function that will query the database for the user to be updated:
The user will then be passed to the Update action function which will execute a statement using the passed values:
4. Deleting a user
The final action to configure would be to delete a user. When a user ID is passed through the /delete route, a corresponding statement should be made removing the entry from the database. The following function should achieve this:
Your main.go file should now be similar to the following:
This should simplify accomplish the CRUD operations required to manipulate the database. In the next article, we’ll be adding an authentication layer to restrict or enable access and functions based on a user identity.
ไม่มีความคิดเห็น:
แสดงความคิดเห็น
หมายเหตุ: มีเพียงสมาชิกของบล็อกนี้เท่านั้นที่สามารถแสดงความคิดเห็น